The Center for Teaching & Learning Innovation, in collaboration with a pilot group of faculty members and the Canvas support department, has developed a course template that is available in Canvas Commons. It has been designed to be flexible, program agnostic, and student centered.
Please note that the template described below differs from the version used by the VTSU Online division. Instructors can learn more about the Online campus as well as their Canvas template by accessing the VTSU – Online Open Office page.
What are the advantages of using the template?
Ease of Development – The template is simple by design but provides a faculty member with room to tweak it to best meet the needs of the course and program.
Student Navigation – Best practices in the field along with VTSU student survey feedback indicate that a consistent course design improves ease of navigation within Canvas. Students prefer to learn new course content without having to learn how to navigate Canvas modules and pages that differ considerably from class-to-class. The template has been developed to meet this need.
Does Vermont State provide assistance with Canvas course design?
Yes, help is available! There are two primary groups who can provide assistance. Both departments work in a collaborative manner, but it is best to follow these general guidelines:
Canvas Support
They are the primary point of contact. Canvas Support staff members have administrative rights to the course as well as the system as a whole and a high-degree of technical knowledge.
Contact Canvas Support: https://servicedesk.vsc.edu/
Center for Teaching & Learning Innovation
The CTLI focuses more on pedagogical concerns and “why” a faculty member would want to adopt a given feature (whereas Canvas Support focuses more on “how” a faculty member can implement a tool or resource).
Contact CTLI: CTLI@vsc.edu
Is this the final version of the template?
Student, faculty, and institutional needs can change over time. The current template has been designed for use during the current academic year, but iterative improvements will be made based on informal feedback and data drawn from formal faculty and student surveys.
Preview of the template frontpage
Below is a screenshot of the Canvas template’s frontpage:
Importing the Template
Canvas courses are made available to members of the faculty 90 days prior to the start of a given semester. The early access is beneficial as it provides adequate time to develop the course and resolve any issues or concerns. Classes are unpublished and do not include content from the template or previously designed courses, so the steps below need to be followed in order to import the modules, pages, and other components of the template.
If importation issues occur, please reach out to Canvas Support for assistance.
Step 1: Access Canvas Commons
When an instructor enters a Canvas course for the first time, a Course Status pane will be visible on the right side of the screen as shown in Figure 1 below. Select the Import from Commons button to access Canvas Commons.
Step 2: Navigate to the VTSU Faculty – Canvas Template
The Commons includes a multitude of resources, so it is recommended that the faculty member search for the template rather than scrolling through the available options. As shown in Figure 2 below, complete a search using the phrase: VTSU Faculty. Then, click-on the template’s tile to access it.
Step 3: Import the Template
Once the template has been selected, click or tap the blue Import/Download button on the right side of the screen as shown in Figure 3 below.
Then, on the subsequent screen, check the box for the course in which the template will be used and select the blue Import into Course button to complete the process.
NOTE: Processing times can vary and imported content may not appear in the course for several hours.
Updating the Course
This section of the guide includes recommended steps for updating the course once the templated content has been imported. This includes updating the relevant pages, modifying assignment categories, and adding assignments to the class.
Step 1: Update the Course Front Page
Upon entering the course, the faculty member is presented with the Canvas Front Page, which includes placeholder content that will need to be updated. Red arrows have been added to Figure 4 below to indicate the information that should be customized.
In order to make the necessary updates, the edit button above the right side of the front page can be used to access Canvas’ visual editor. Once the updates have been completed, select the Save button to exit the visual editor.
NOTE: In addition to Week 1, the dates associated with the remaining weeks in the semester should also be updated as an indication to the students of when course content will be covered.
Step 2: Update the Helpful Resources Pages
The front page includes links to several helpful resources, each of which is described below. As with the front page itself, use the Edit button on each page to make the necessary changes.
- Course Syllabus – Use the Edit button to add content that is included in a typical syllabus. If desired, faculty can review a Microsoft Word based syllabus template in the Guides and Templates section of this site.
- Contact Me – This page is used to provide easy access to the faculty member’s contact information, which includes an email address, phone number, Zoom link, office hours, and office location.
- Student Resources – As opposed to the Contact Me page, which is faculty focus, the Student Resources page can be updated to include links to frequently used course resources and/or the contact information for available campus-based support departments, such as academic support, health and wellness, and disability services.
- Class Question & Answer Board – This content item can be an asset in terms of classroom management. It is a discussion forum where students can ask course related questions and instructors and peers can provide responses that are visible to the entire class.
Step 3: Update the Weekly Introductions
Weekly introductions are very beneficial as they provide students with concise snapshots of the content being covered, the learning objectives that will be achieved, and the readings and other course materials that will need to be reviewed.
To access each weekly introduction, click or tap the links listed in the Course Content section of the front page. Then, use the Edit button in the upper-right side of each page to access Canvas’ visual editor. Once the updates have been completed, select the Save button to exit the visual editor.
Figure 5 below is an example of a weekly introduction page. It should be noted that the ASSIGNMENTS link takes the students to a module listing all of the assessments posted within the course.
Step 4: Edit the Assignment Groups
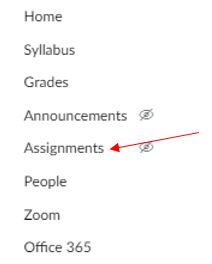
In Canvas, assignment groups are the weighted categories into which each assignment is placed. These groups can be accessed by selecting the Assignments link from the left-hand navigation panel as shown in Figure 6 below.
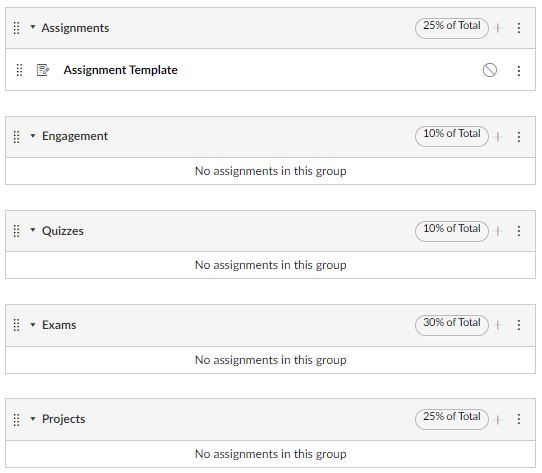
The default assignment groups include Assignments, Engagement, Quizzes, Exams, and Projects. These categories and their associated weights are shown in Figure 7 below.
Editing assignment groups is often necessary when (a) there is a category on the syllabus that isn’t present in the template and (b) the description of the group doesn’t quite fit the description in the syllabus. For example, ‘Labs’ is a category that isn’t present in the template and might need to be added and ‘Papers’ could be a better fit than ‘Projects’ in some courses, which would necessitate the renaming of the group.
Adding a Group
- While on the Assignments page, select the Group+ button on the upper-right side of the screen.
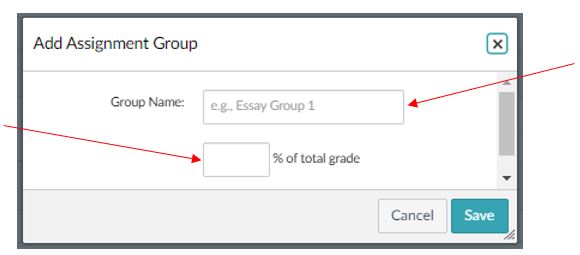
- A pop-up window will open, as shown in Figure 8, which allows the new group and associated weight to be added.
- Once this information has been added, select Save.
IMPORTANT: Total weighting for assignment groups must add up to 100%. If a new group is added, the weighting of the other groups must be decreased until the total percentage is 100%.
Renaming a Group
In order to rename a group, select the kebab icon on the far right of the group as shown in Figure 9 and click the Edit button.
In the resulting pop-up window, simply enter the new name in the Group Name field and click Save as shown in Figure 10 below.
Step 5: Adding Assignments
Once groups have been established, assignments should be added to the course. The number and types of assessments offered can vary based on several factors, such as the academic program’s requirements, the modality in which the course is being delivered, and the preferences of the instructor.
Below are instructions for creating assignments using three different mechanisms in Canvas: Discussions, Quizzes, and Assignments.
Discussions
Discussion boards are predominantly used for online courses as the basis for class engagement or participation, but they can also be used for low-stakes classroom assignments and topical question and answer boards.
The first step in creating a discussion board is to select the Discussions link in the course’s left-hand navigation pane as shown in Figure 11 below.
Next, select the green +Discussion button in the upper-right corner of the screen. On the resulting page, several elements should be added: a topic title, a description of the assignment and its requirements, the dates it will be available, and whether it will be a graded assignment. The fields that will need to be populated are shown in Figure 12 below.
If the assignment is going to be graded, selecting the Graded checkbox will open up a few additional settings that will need to be updated:
- The Points Possible, which is usually 100 when group weights are used in a course.
- The Assignment Group, which is very important because it is the setting used to align the assignment with the appropriate assignment group (e.g., Engagement).
- The Due date for the assignment. Setting a date is important because students will see the date on their course calendars.
Each of these settings is shown in Figure 13 below.
Finally, select the Save button in the bottom right of the screen to save the discussion assignment. The Save & Publish button can also be used if the assignment is ready to be seen by students.
Quizzes
The first step in creating a quiz or exam is to select the Quizzes link in the course’s left-hand navigation pane as shown in Figure 14 below.
Next, select the +Quiz button in the upper-right corner of the screen. On the resulting pop-up screen, choose the type of quiz that will be developed, Classic or New, and select the Submit button. Feedback from several VTSU faculty members and technologists indicates that the Classic format is preferable and the following verbiage and images will be drawn from the classic quiz view.
When creating a new quiz or exam, there is some initial information that should be entered prior to adding questions. On the Details tab, which will appear by default, the following updates should be made:
- Enter the name of the quiz or exam. Including the week of the quiz in the name is encouraged as it makes the assessment more easily recognizable by the the students.
- Add instructions or vital information to the visual editor, such as the time limit and the types of questions that are included.
- Use the first drop-down menu to set the quiz as graded or ungraded.
- Use the second drop-down menu to select the assignment group associated with the quiz. In most cases, it will be Quizzes or Exams.
The settings listed above are identified in Figure 15 below:
There are several additional settings at the bottom of the Details screen. Although most are optional, such as setting a time limit, including due dates and the period of availability is an important part of the process as it provides students with a timeline and the information appears on their Canvas course calendar. A screenshot of these settings is shown in Figure 16 below.
Once the aforementioned details have been entered, select the Questions tab at the top of the screen and choose the +New Question button to begin entering the quiz questions. As indicated in Figure 17 below, use the drop-down menu to select the question type (e.g., True/False), enter the number of points in the box provided, and enter the question into the Canvas visual editor. Then, enter the answer(s) and either choose the +New Question button to continue adding questions or the Save button if the quiz is finished. The Save & Publish button can also be used if the assignment is ready to be seen by students.
Assignments
This assessment type is typically used for class assignments, projects, papers, and labs and there are two approaches to adding them: (1) start from scratch or (2) duplicate the unpublished assignment template.
Start from Scratch
Begin by selecting the Assignments link from the left-hand navigation pane. Then, choose the +Assignment button in the upper right-hand corner of the screen. On the resulting screen:
- Enter an assignment name in the field provided.
- Type directions for the assignment in the visual editor.
- Enter the point value of the assessment in the Points field.
- Choose the Assignment Group, which is an important step.
- Use the drop-down menu to indicate whether grades will appear in the gradebook as points or a percentage.
- Choose the submission type, which is typically a file upload, and the number of submissions allowed.
- Enter the due date and range of availability, which are also important steps.
Then, update any other setting that is applicable to the assignment and click the Save button to complete the process. The Save & Publish button can also be used if the assignment is ready to be seen by students.
Duplicating the Assignment Template
Using the template is the preferred method as it provides students with a standardized format that is consistent from week-to-week during the semester. Begin the process by selecting the Assignments link in Canvas’ left-hand navigation. Then, select the kebab icon on the far right of the assignment template and choose Duplicate from the drop-down menu as shown in Figure 18.
Next, select the link for Assignment Template Copy and the Edit button in the upper-right corner of the resulting screen. At this point, the steps below, which are similar to those in the starting from scratch section, can be followed.
- Change the assignment name in the field provided.
- Update the placeholder information in the visual editor.
- Enter the point value of the assessment in the Points field.
- Choose the Assignment Group, which is an important step.
- Use the drop-down menu to indicate whether grades will appear in the gradebook as points or a percentage.
- Choose the submission type, which is typically a file upload, and the number of submissions allowed.
- Enter the due date and range of availability, which are also important steps.
Then, update any other setting that is applicable to the assignment and click the Save button to complete the process. The Save & Publish button can also be used if the assignment is ready to be seen by students.
Canvas Best Practices
Although not an exhaustive list, below are several recommendations for preparing a course prior to the start of the semester.
- Select the Student View button in the upper-right corner of the screen to evaluate how the course will appear to the student.
- Gain a familiarity with steps for creating an accessible Canvas course prior to adding content to the class.
- Test the hyperlinks within the course to verify they are working properly.
- Set due dates for all assignments, so they are clearly visible to students in their course calendars.
- Use a consistent naming convention for assignments. One best practice is to use the week number as a prefix (e.g., Week 1 – Class Assignment).
- Use the Announcements feature to post a welcome message to the class.
- Verify that all assignments have been published.
- Review the course gradebook to verify that all assignments are present.
- Avoid the use of scanned PDF documents as they will not work for student who rely upon screen readers.
- If using Zoom to meet with students, please be sure to turn on Closed Captioning.